Understanding the Anatomy of a Microscope
Amanda2025-09-24T14:26:25+00:00Laboratory microscopes are essential tools in scientific research and education, allowing us to explore the intricate details of the microscopic world. Despite their complex functions, the basic anatomy of a microscope is designed to be intuitive and user-friendly. Here’s a closer look at the key components of a typical laboratory microscope and how they contribute to its operation.
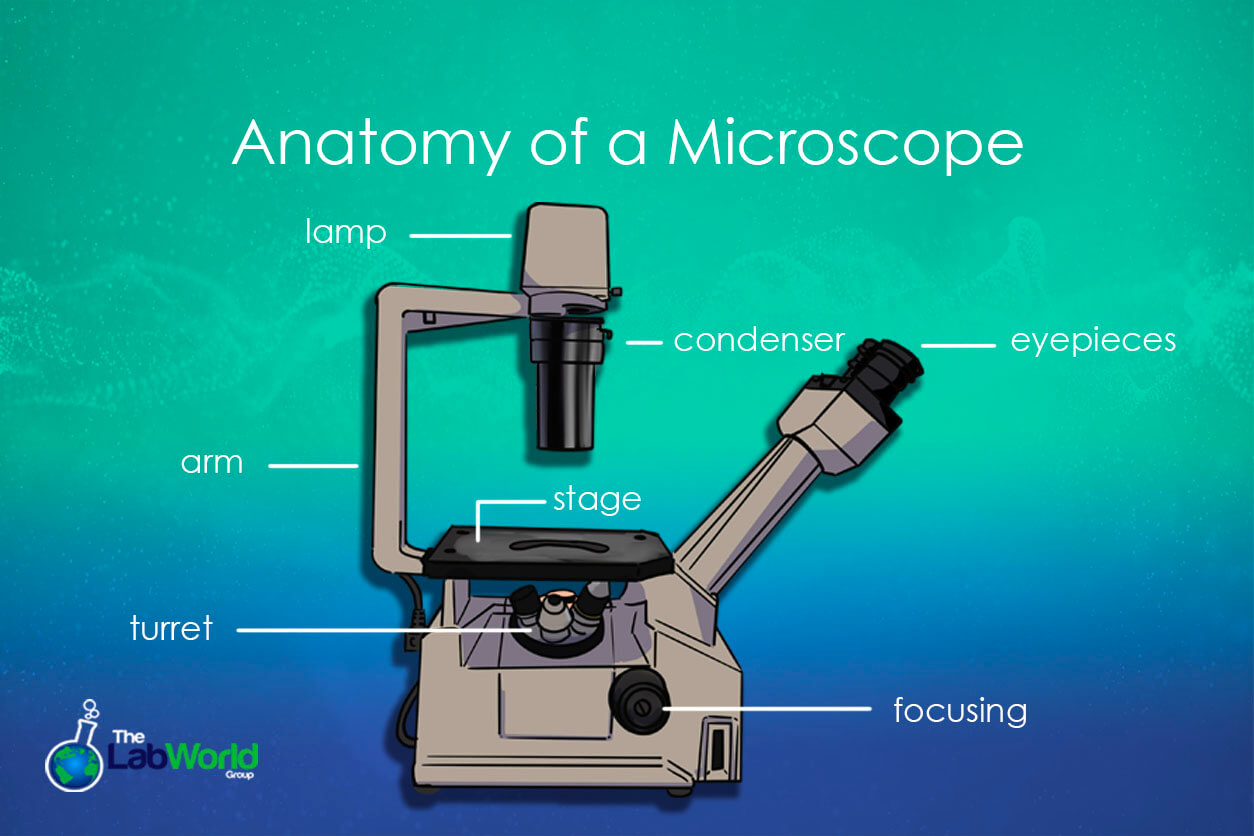
Base and Arm
The base of the microscope provides stability and support for the entire instrument. It is usually heavy to prevent the microscope from tipping over; some bases are specially designed to be as stable and vibration-free as possible, enabling the precise capture of images or video. The arm connects the base to the upper parts of the microscope, including the stage and optical components. The design of the arm enables unobstructed placement of slides and labware, stage movement, and proper focal distances.
Stage
The stage refers to the flat platform where the specimen is placed for observation and examination. It typically features mechanical stage clips or a mechanical stage assembly that securely holds the slides or other vessels, such as a petri dish, in place, centering the specimen in the field of vision. Some stages are equipped with X-Y controls, which enable more precise horizontal and vertical movement of the slide, allowing users to view a more complete picture of the specimen or follow live cells as they move.
Illumination System and Condensers
The illumination system provides the necessary light for viewing the specimen. Most laboratory microscopes use a built-in light source, typically a tungsten bulb or LED, and are partnered with a condenser. The condenser is an optical lens designed to focus the light beam and create a cone of light. Depending on the objective being used, the condenser is adjusted so that each objective receives the correct amount of light needed. Adjusting the condenser height and aperture can enhance contrast and resolution, depending on the type of microscopy being used. The light source is also often adjustable, with a dimmer control to regulate brightness. For more advanced microscopes, such as fluorescence or phase contrast microscopes, specialized light sources and filters are used to enhance specific imaging techniques.
In an upright microscope, the condenser and light source are located beneath the stage, focusing light through the specimen from below. For an inverted microscope, the light source and the condenser sit above the stage. There are occasions where a condenser isn’t the best option, particularly when viewing crystals at high magnification, or when viewing at low magnification, a condenser can limit the field of view. There are three main types of microscope condensers: a alanatic condenser that corrects for spherical aberrations (or blurriness due to lens shape and refracted points of light. Another type is a compound achromatic condenser that corrects not only spherical aberrations but also color aberrations, focusing all colors into a single point. The third type is an Abbe condenser, also known as a chromatic condenser, where no attempt is made to correct for either chromatic or spherical aberrations.
Darkfield Illumination, however, blocks the central directed rays of light. Instead, light is brought in at an obtuse angle, creating a high contrast between the transparent object in view and the light source, which forms an inverse cone of light.
Epi Illumination is positioned above the specimen and is commonly used in fluorescence applications. The high-intensity light is filtered through an excitation filter designed to activate a fluorescent dye at a specific wavelength, which will then emit another wavelength for image capture. Emmision, Excitation, and Dichroic filters are paired with epi illumination.
Objective Lenses
Objective lenses are the primary optical components that magnify the specimen. They are mounted on a rotating turret above or below the stage, depending on the type of microscope. This turret nosepiece allows the user to switch between different magnification levels quickly while observing. Objectives come in various magnifications, typically ranging from 2x (low power) to 200x (oil immersion). Each lens is designed with different numerical apertures to enhance image resolution and clarity. Refractive objectives are the most common in labs, consisting of optical elements coated with anti-reflective treatment that improves overall light performance. A basic apochromatic objective is the simplest and consists of an achromatic lens and a meniscus lens. The more complex and high-end objectives are plan-apochromatic, with as many as 15 elements that correct the incoming beam for flat field and chromatic aberrations.
Reflective objectives, however, are mirror-based rather than lens-based. Because it uses a metal surface instead of glass, you don’t run into the same need for as many corrective elements as you would with glass lenses. Reflection also makes UV and IR spectral ranges more feasible.
Ocular Lens (Eyepiece)
The ocular lens, also known as the eyepiece, is located at the top of the microscope and is where the user looks through to view the specimen. It typically provides additional magnification, usually 10x or 15x, and works in conjunction with the objective lenses to achieve the desired total magnification. Some microscopes feature eyepieces with built-in reticles or micrometers for precise measurement of specimens. The ocular lens is another area where users can adjust their view to obtain the most accurate image possible. Eyepieces often can be adjusted for interpupillary differences. At the same time, the individual diopter adjustments enable users to account for the differences in their own eyesight, allowing for fine-tuned viewing without glasses.
Focusing Mechanisms
The focusing mechanisms are crucial for obtaining a clear, sharp image of the specimen. Microscopes generally have two types of focusing controls:
Coarse Focus: This is the larger knob used for making initial adjustments to bring the specimen into approximate focus. It moves the stage or objective lenses in larger increments.
Fine Focus: The finer, smaller knob is used for precise adjustments to achieve a sharp, detailed view. It allows for delicate changes in focus, essential for high-magnification observations.
Conclusion
The anatomy of a laboratory microscope is a carefully designed interplay of components, each contributing to its overall functionality. From the stable base and precise focusing mechanisms to the versatile objective lenses and illumination system, every part plays a role in enabling detailed observation and analysis of microscopic specimens. Understanding these components helps users maximize the potential of their microscopes and enhances their ability to conduct accurate and insightful scientific research.